I previously posted about jtiong.dev – keeping my commit logs going and making things presentable for future collaborators and colleagues, as well as my own little bit of self promotion on the internet.
With my recent break in work and taking the time to both sharpen and upskill myself – I thought I’d bring this into the new future with the site pulling from my Github account instead of a now defunct GitLab installation.
In the current “1.0” version:
- Commits are automatically fed through via CURL request
- There’s no censorship for any potentially sensitive information
- There’s no authentication for management of commits/repos
- There’s no filtering you can do
- The date/commit times are inconsistent
Not to mention it’s GitLab powered and as I’m currently working through some property changes – I’m bouncing between two properties and the server hardware hosting GitLab is currently turned off.
Queue, my move to using Planetscale as my core DB service for my personal online stuff, and moving my code to Github where possible (because it’s where everyone else is).
For version 1.1 which upgrades this, I’d like to add:
- A system with Auth that lets me hide a repo, or a given commit hash for any potentially sensitive info from being revealed
- A filtering system by repo so you can see, per repo, the commits to that repository
- More accurate representation of the commits/date/timeline
Implementation Logic
Just a couple of loops to go through Repos → Commits is all I really need for my personal scale. Below is a very simplified diagram:
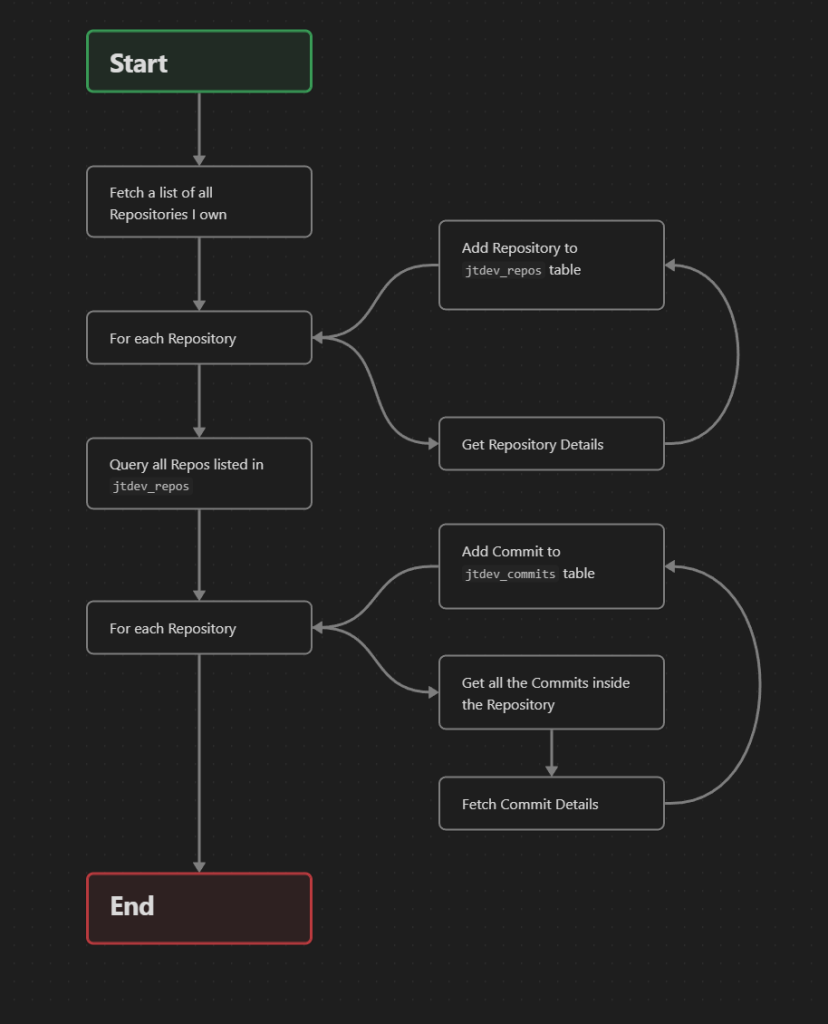
This’ll all be included into some cron tasks that run maybe hourly or so to avoid spamming GitHub.
It’s just simple little pleasurable busywork to be honest, but after about 6 months of not really touching any code and taking my time with stuff, it’s nice to get back into the groove!
I’m thrilled to announce that I’m going to be launching a Conan Exiles server personally for friends and family to play on. As a fan of the survival game genre – Conan Exiles offers a pretty unique blend of resource gathering, adventuring, and exploring a wilderness filled with monsters, animals and gods.
Just for my own reference – the server settings (in their unedited form) are below. An explanation of the settings is available here:
MaxNudity=0
ServerCommunity=0
ConfigVersion=9
BlueprintConfigVersion=19
PurgeNPCBuildingDamageMultiplier=(5.000000,5.000000,10.000000,15.000000,20.000000,25.000000)
PlayerKnockbackMultiplier=1.000000
NPCKnockbackMultiplier=1.000000
StructureDamageMultiplier=1.000000
StructureHealthMultiplier=1.000000
NPCRespawnMultiplier=1.000000
NPCHealthMultiplier=1.000000
CraftingCostMultiplier=1.000000
PlayerDamageMultiplier=1.000000
PlayerDamageTakenMultiplier=1.000000
MinionDamageMultiplier=1.000000
MinionDamageTakenMultiplier=1.000000
NPCDamageMultiplier=1.000000
NPCDamageTakenMultiplier=1.000000
PlayerEncumbranceMultiplier=1.000000
PlayerEncumbrancePenaltyMultiplier=1.000000
PlayerMovementSpeedScale=1.000000
PlayerStaminaCostSprintMultiplier=1.000000
PlayerSprintSpeedScale=1.000000
PlayerStaminaCostMultiplier=1.000000
PlayerHealthRegenSpeedScale=1.000000
PlayerXPRateMultiplier=1.000000
PlayerXPKillMultiplier=1.000000
PlayerXPHarvestMultiplier=1.000000
PlayerXPCraftMultiplier=1.000000
PlayerXPTimeMultiplier=1.000000
DogsOfTheDesertSpawnWithDogs=False
CrossDesertOnce=True
ThrallExclusionRadius=500.000000
MaxAggroRange=9000.000000
FriendlyFireDamageMultiplier=0.250000
CampsIgnoreLandclaim=True
AvatarDomeDurationMultiplier=1.000000
AvatarDomeDamageMultiplier=1.000000
NPCMaxSpawnCapMultiplier=1.000000
serverRegion=0
RestrictPVPTime=False
PVPTimeWeekdayStart=0
PVPTimeWeekdayEnd=0
PVPTimeWeekendStart=0
PVPTimeWeekendEnd=0
RestrictPVPBuildingDamageTime=False
PVPBuildingDamageTimeWeekdayStart=0
PVPBuildingDamageTimeWeekdayEnd=0
PVPBuildingDamageTimeWeekendStart=0
PVPBuildingDamageTimeWeekendEnd=0
CombatModeModifier=0
ContainersIgnoreOwnership=True
LandClaimRadiusMultiplier=1.000000
BuildingPreloadRadius=80.000000
ServerPassword=
ServerMessageOfTheDay=
KickAFKPercentage=80
KickAFKTime=2700
OfflinePlayersUnconsciousBodiesHours=168
CorpsesPerPlayer=3
ItemConvertionMultiplier=1.000000
ThrallConversionMultiplier=1.000000
FuelBurnTimeMultiplier=1.000000
StaminaRegenerationTime=3.000000
StaminaExhaustionTime=3.000000
StaminaStaticRegenRateMultiplier=1.000000
StaminaMovingRegenRateMultiplier=1.000000
PlayerStaminaRegenSpeedScale=1.000000
StaminaOnConsumeRegenPause=1.500000
I’m a bit of a purist and don’t want to detract too much from a vanilla experience. Likewise, I may also work towards doing a server reset on a fairly long schedule (unsure yet, but I’m thinking every 90 days).
This is mostly a personal note on how to setup a workflow with my Web Development (PHP/MySQL & Docker based) projects. Usually, with pretty much any project, the workflow goes as follows:

Figure: My workflow prior to this article
To host my own repositories of codes per project, I actually use GOGS which is short for Go Git Service – it’s written of course, in google Go, and is essentially a self-hosted Github clone. It’s by one of the devs from the Gitlab team, and it’s far more lightweight and easier to use in a personal scope, than Gitlab (Gitlab is still wonderful, but I think it’s better suited to teams of 2 or more people).
Git hooks are amazing!
The above workflow diagram though, is missing one really critical stage – getting the code to production – a.k.a. deployment. Typically on any deployment, after the above workflow, I’d either remote in, or set up a cron job to pull from master. There’s some problems with this method of doing things:
- I’m doing a git pull which is based on merges, and can really cause some shit if there’s a conflict (there shouldn’t be, but just in case)
- I’m remoting into the server each time I have to pull for some commits, this takes up time. I’m a serial commit/push-as-save person
- It’s completely against the ethos of a developer. If I’m doing something repeatedly, I should find a way to automate it!
So, enter stage – Git hooks. Git hooks are amazing! They’re actually natively supported by Git (powered by Git) and I only really just started learning about using them. I vaguely recall encountering them earlier in my growth as a dev, but I must’ve shelved it at some point and given up trying to learn hooks (probably around the same time I cracked it at Drone CI, and Jenkins CI/CD).
Anyway, the overall concept of using a Git Hook is that I reach the final stage of the workflow I drew at the start of this article Git push to remote repository – the idea is that the Git repo then registers this push in something called a post-receive hook. It then performs some functions and essentialy plonks a pull of the latest code of my repo, into the production environment.
At first, I started off with something super simple, from my jtiong.com (this website!) repository as an example:
#!/bin/sh
ssh [email protected] 'cd /var/www/jtiong.com && git fetch && git reset --hard origin/master'
Unfortunately, this didn’t seem to work. I kept getting remote: Gogs internal error messages, and figured out it was something to do with my SSH keys not working in the authorized_keys and known_hosts files of the docker container to server shell and vice versa. After a lot of Google-fu and tinkering around, I eventually came up with the following which worked (note, it’s been edited to be a generic solution).
#!/bin/bash
ssh -o StrictHostKeyChecking=no [email protected] -p 22 -i /home/git/.ssh/id_rsa 'cd /project/folder/path && git fetch && git reset --hard origin/master'
It’s not entirely necessary, but I used the -p and -i options to specify both the SSH port and identity file used with the SSH connection (just for greater control, you should be able to remove them, your results may vary). The key section of the above command that I want to highlight is the -o StrictHostKeyChecking=no option that I’ve set. This got rid of any Host Key issues between the docker container and the host server for me. So if you’re encountering issues with your Host Key Verification or similar, this might fix your problems!
With the git command now, I used git fetch && git reset --hard origin/master instead of just doing a git pull. Why? Because git pull uses merge methods and can result in some conflicts with code, and issues that are just messy and a bad experience to untangle. Using git reset, moves the code’s pointer to a different commit without merging anything. It just overwrites it, making it slightly safer for deployment!
But of course… Why do things in just a simple way? This particular hook configuration is great for something like my personal site where I don’t mind if I’m pushing breaking bugs to production (within reason). However, when I’m doing work for clients, I need to be a little bit more careful – and I use a more typical production, staging, development branching method with my Gitflow.
Here’s what I use now:
And wonderfully – this lets me have separate branches, as required and updates the appropriate (sub)domain as needed! The wonder of Git Hooks has now streamlined how I develop projects, and deploy them in a much more pain-free manner! And so I dramatically take another step in my journey and growth as a developer haha 😛

See and Download my Current Layout Here
Back at the start of the year, I picked up an Ergodox EZ keyboard; in an effort to save my wrists from the terrors of RSI. The keyboard, is actually quite alien compared to most standard keyboards, with something of a split QWERTY layout, it still bugs a lot of people when they see the keyboard.

Needless to say, it’s taken me quite some time, in fact, I still am adapting to using this keyboard. It doesn’t help even more that I’m using a regular shaped keyboard at work everyday, either.
I still make a lot of typo errors, and I’ll stumble every now and then based on games asking me to press certain non-alphanumeric keys (Ctrl, Shift, etc.) and I sorely miss the arrow keys being in that familiar up/down/left/right shape on a regular keyboard. Instead, it’s an almost Vi-esque left/right/up/down setup. Still, I’ve persisted, and my typing speed almost matches the original keyboard layout speeds I had.
Where I really started to fall in love with the ErgoDox EZ though, is the eventually gentle tweaking I’ve been doing over time to the default key layout that the keyboard shipped with. It’s really become my own keyboard, and it’s been a journey that I’ve found myself looking at other lovely keyboards and told myself “No, I’m going to tough it out with the ErgoDox, because it’s unique, it’s mine.”
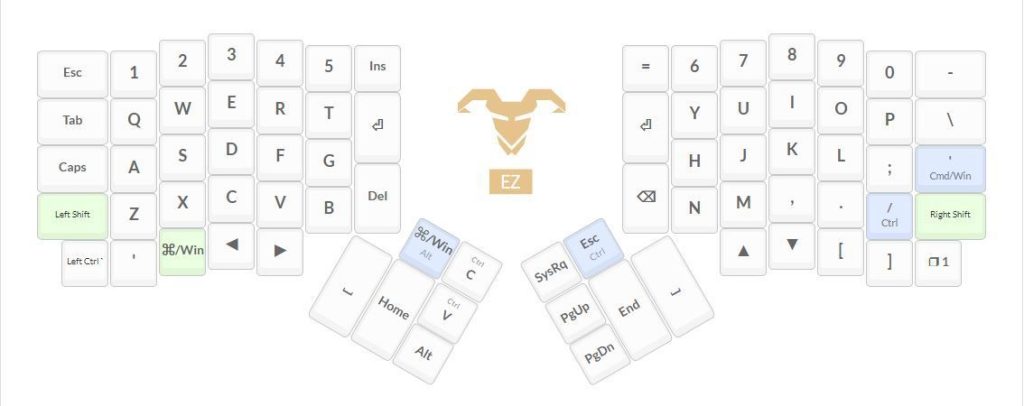
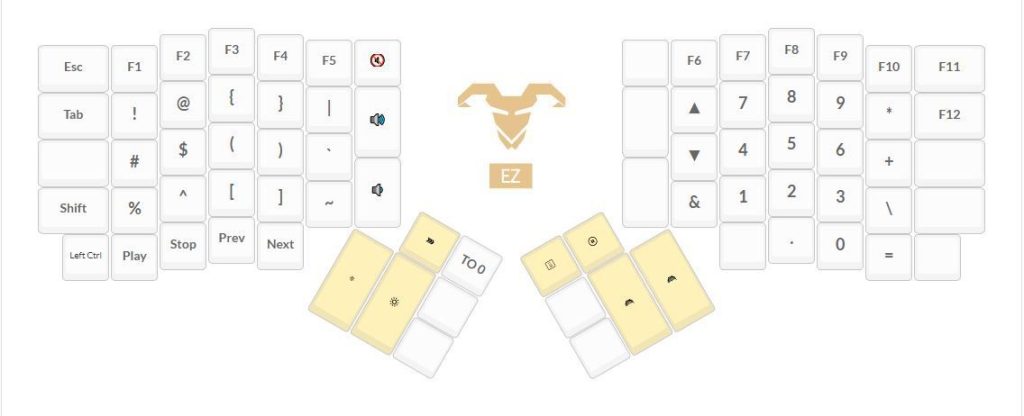
Without further ado though, here’s the layout – it’s split over two layers, with a toggle button in the bottom right to switch between layers. I can add a couple more layers on top (0 – 3 layers), but I’m trying to keep it to a minimum.
LAYER 0
LAYER 1
And as per the link at the top of this post, you can see and download my Layout Here. It’s dubbed version 3.4 — if you search the layouts on the configuration site for “jaytwitch” it’ll interestingly bring up a few of my historical layouts too 🙂